The more streamlined, hands-off approach of Fulfillment by Amazon can be very appealing to sellers. Not only will Amazon pick, pack and ship orders for you, they’ll even handle customer service and returns. Your products will also be Amazon Prime eligible, another big advantage due to Prime’s ever-growing popularity. But first things first — how do you even start shipping to Amazon FBA?
Amazon has more than 75 fulfillment centers and counting across the North America, many of which are set up for FBA. Shipping to Amazon FBA is relatively easy, but it does take some work. There are many decisions to be made, and some product categories require extra measures to be taken.
Due to the incredible amounts of inventory they receive, Amazon’s FBA warehouses operate under strict guidelines. All products must be properly shipped, labeled and prepared for the safety of the item as well as for the employees handling them. This also streamlines their intake and shipment processes. Stay in compliance with Amazon’s rules or risk facing penalties and/or extra fees.
And speaking of fees, make sure you’ve carefully reviewed Amazon’s fulfillment and monthly storage fees. Understand all applicable — and even potential— fees so you’re not caught by surprise later on.
Creating a Shipping Plan
Creating a shipping plan is the first step for shipping your items into Amazon. A shipping plan will identify:
- The products you’re sending to Amazon
- Quantities of each product
- Your shipping method and carrier
- Who will handle product preparation and labeling (you or Amazon)
If you’re shipping in a Private Label product, you’ll need to create a listing for that product before creating a shipping order. Shipping orders are tied directly to a listing – creating that listing, if it doesn’t already exist, will allow you to then create your Shipping Plan. If you haven’t already created a listing, log into Seller Central and head to Inventory > Manage Inventory. From there, you will be able to add products to your account by clicking on Add A Product in the top-right section of the page. After you’ve added your product, and filled out all of the appropriate information for that product, your listing will be complete!
Once this is done, you’re ready to create your Shipping Plan. Go to the Manage Inventory page and select each item you want to ship to Amazon. Select Send/Replenish Inventory from the Actions on Selected drop-down menu. From here, you can create a new shipping plan or add to an existing one.
Next, verify your ship-from address. This is where you’re shipping the products from, so it may be your home, business or supplier. If your products are shipping from a Chinese Manufacturer, for example, you would need to input your manufacturer’s address here.
Confirm the packing type next. Individual products are single products of different qualities and conditions, while case-packed products are identical items in the same condition. Typically arbitrage sellers will create Individual Product shipping plans, while most Private Label sellers will create Case-Packed shipping plans. In each of these cases, an arbitrage seller might have a lot of different items in one box shipping into Amazon (Individual Products) while a Private Label seller might have a lot of the same item to ship into Amazon (Case-Packed).
Click Continue to shipping plan. You can now proceed through the 6 main steps sellers must follow to fulfill a shipping plan. These steps are detailed below along with other important things to note.
Things to Note
- You can still fulfill select orders yourself, just make sure these items aren’t selected when creating your FBA shipping plan
- If you previously fulfilled orders on a product, it can be switched to FBA in the future
- Bulk shipping plans can be created
- Per Amazon’s fulfillment infrastructure, your shipping plan may be broken up into multiple shipments that require you to send products to different fulfillment centers in order to make them more readily available to customers; to send your shipment to a single fulfillment center and have Amazon split them for you, in your Seller Central account go to Settings > Fulfillment By Amazon > Inbound Settings > Inventory Placement Option > Edit (service fees will apply and exceptions do exist; this will only apply to shipments created after settings are updated)
- To apply setting updates to a current shipment, delete the shipping plan, make the desired changes and recreate it by selecting the plan under Deleted/canceled and then duplicating it on the Send/Replenish Inventory page
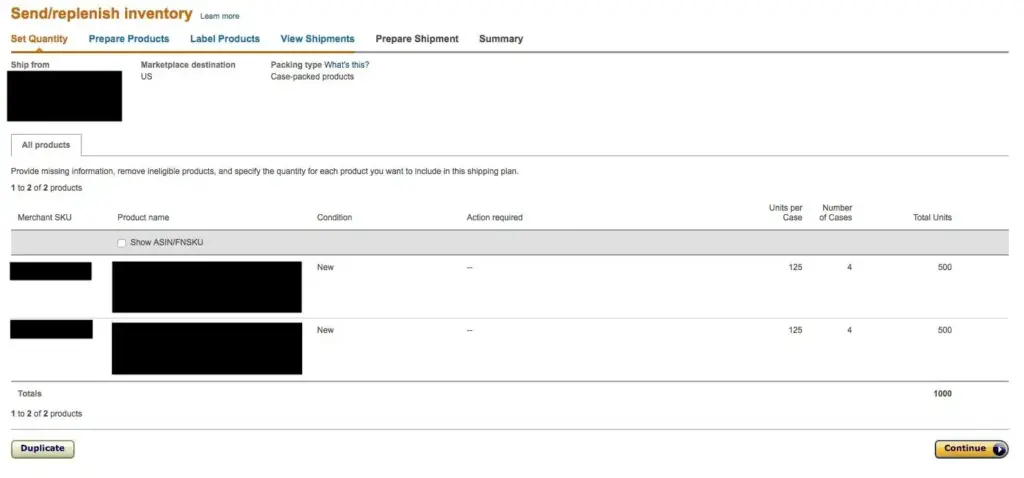
Step 1: Set the Quantity
Setting the quantity is the first step in fulfilling your shipping to Amazon FBA plan. Fill in the quantity of all inventory you have in stock and want to send.
At this point, you may receive any of the following notifications:
- Information Required: More information is needed for a product
- Removal Required: The item must be removed from the shipping plan
- Action Recommended: Amazon has identified the product as slow moving and recommends it be removed
- Excess Inventory: You have more than the recommended number of units in stock
The action recommended and excess inventory alerts can be bypassed by indicating you’ve acknowledged the alert. Make sure all removal required products are removed before continuing.

Things To Note
- You can duplicate a previous plan and make adjustments to it to save time when you’re sending the same products again in the future
- Only inventory you’ve previously set to fulfillment by Amazon is searchable under Search My Inventory
Step 2: Prepare the Products
As we previously mentioned, Amazon requires products to be prepared to their standards. And even if you choose to have Amazon prepare and label products for you and pay the per-item fee, you’ll still need to safely ship them to a warehouse.
This may require extra packaging materials, so make sure to read about all packaging and prep requirements for sending FBA inventory.
If you didn’t select Amazon to prep your products, you must do it yourself. Follow all FBA prep requirements or face unplanned prep service fees. Many sellers will have their manufacturer or Freight Forwarder prepare their products to save time and money. If you ask either your manufacturer or Freight Forwarder to do so, make sure that they are aware of the FBA prep guidelines and requirements.
See the Prep required tab on the Prepare Products page for prep guidance on products with set preparation requirements. You may be required to use any of the following:
- Poly bags
- Bubble wrap
- Opaque bags
- Tape
Products will appear under the Prep may be required tab if their prep guidance is unknown. Select the corresponding product category to determine if additional prep is needed. Click Continue when you’re ready to proceed.
Things to Note
- Amazon FBA will only prep products with UPCs
- Click Investigate on the Prep Products page to start a review of prep requirements you feel aren’t applicable or essential
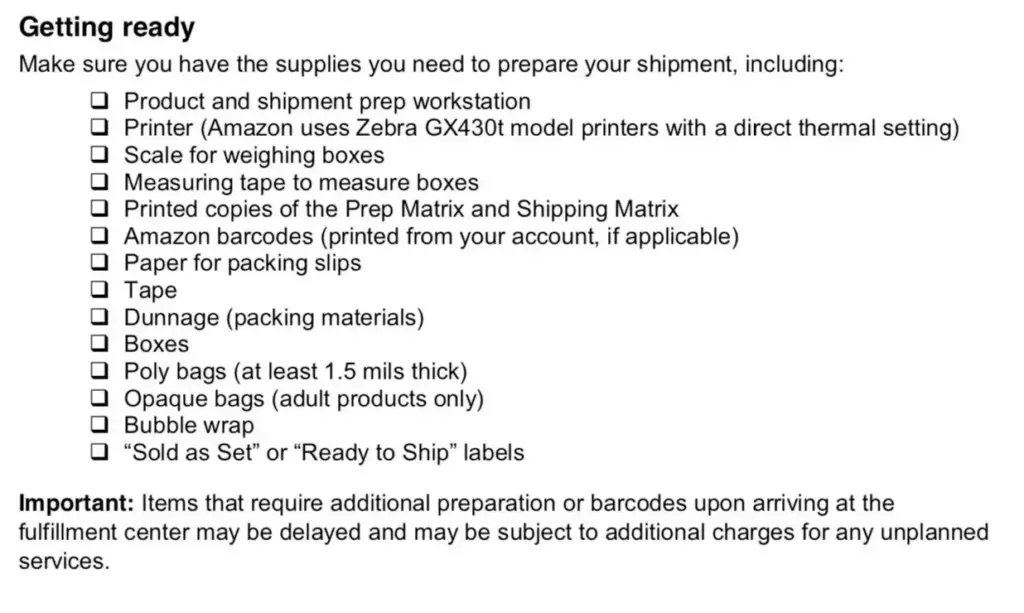
- Use the following checklist from Amazon to stay organized
Step 3: Label the Products
Amazon uses a barcode system to put away and track products. Therefore, all FBA items must be properly labeled according to Amazon standards, unless they qualify for stickerless, commingled inventory. Your labeling options for shipping to Amazon FBA include:
- Using an existing UPC or EAN barcode for eligible products
- Adding an Amazon barcode directly to the product or packaging
- Paying a per-item FBA Label Service fee and have Amazon apply barcodes for you
The Labeling required tab shows all products that require labels. If you’ve chosen Amazon under the Who labels column, you must use the FBA Label Service. Applicable fees will appear in the Label cost column. If Merchant is selected under Who labels, you must label the items yourself.
Once this information is set, it’s time to create your barcodes. Click Print labels for this page and make your selections. A PDF will be generated.
Make sure to follow all FBA product barcode requirements. These detail everything from using the right printer and paper stock to the proper label placement. If you are selling products produced by a manufacturer, many Sellers will have their labels printed directly onto either their packaging or their product. This saves the Seller time and money, so we definitely recommend considering this as an option. Manufacturers still need to abide by labeling/printing FBA guidelines.
Things to Note
- You’re able to change who preps a product by returning to the Prepare Products page
Step 4: Review Your Shipment
Carefully review your shipment. Pay close attention to your shipment ID and the destination fulfillment center code and location as your plan could require multiple shipments to different warehouses.
A shipment name will be given to your shipment, but it can be changed. You’ll also see the number of MSKUs (unique product identifiers) as well as the quantity of each MSKU in the shipment.
Remember, any changes you make here will impact your packing lists. It’s best to print pack lists after approving your shipping plan.
Once you approve shipments, the View Shipments page will appear. Your shipment plan is now set, and your shipment needs to be sent to the designated Amazon fulfillment center or centers. To proceed, click Work on shipment.
Things to Note
- After a shipment is approved, you can’t delete it and corresponding listings will be changed to Fulfilled by Amazon
- At this point, you have limited ability to change product quantities
- Previous FBM listings will become inactive and you won’t be able to fulfill orders for them; once inventory is received, they’ll become active again as FBA
Step 5: Prepare Your Shipment
On the Prepare Shipment page, you can now:
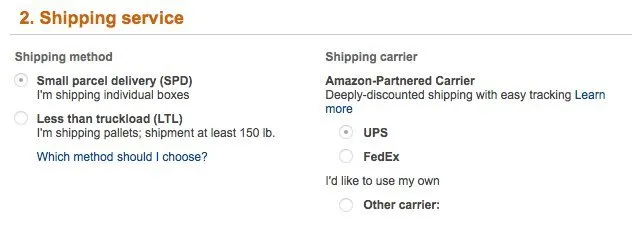
- Select your shipping method and carrier
- Determine the number of boxes needed for shipping
- Schedule and pay for a shipment
- Print box labels
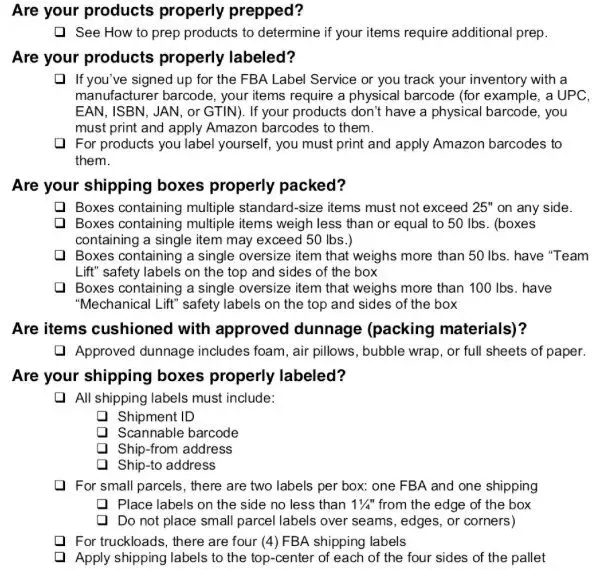
When shipping to Amazon FBA, it’s important to meet all shipment packing requirements. Minor modifications can still be made to your shipping plan, but there’s a limit. If more changes are needed, it’s better to cancel or recreate the plan or delete the shipment.

A small parcel delivery (SPD) is for items packed in individual boxes. Less Than Truckload (LTL) refers to cases or boxes that are stacked and/or secured on pallets. And unlike an LTL truck which may have to stop for other deliveries, a Full Truckload (FTL) goes right to the fulfillment center. Many Private Label sellers fall into shipping using LTL, as many do not yet produce enough inventory to fill an entire truckload shipment (FTL). Make sure you are aware of which category you fall into here. Confirming with either your manufacturer or Freight Forwarder will give you insight into this!
Each shipping method has specific requirements you must adhere to. Please read carefully, as you must input box content information, quantities of each ASIN, box or pallet weight/dimensions, and more.
This page will provide you with an estimated shipping charge which you’ll need to accept to move forward. You can now print shipping labels as well.
Things to Note
- Amazon-partnered carriers offer discounted rates; a 1 lb. minimum charge will apply
- SPD deliveries must be cancelled within 24 hours
- LTL/FTL deliveries must be cancelled within an hour of submitting a shipment request
- You can’t delete a shipment if you’ve requested Amazon partnered carrier labels or if your shipment has already been shipped
- Amazon has a comprehensive checklist to help sellers stay organized
Step 6: Summary
The Summary page is the last step in Amazon’s shipment creation workflow. It provides an overview of your shipment, tracking tools available for use, and the plan’s receiving status. The page has 3 tabs, which Amazon details below in Seller Central:
Once the product is in a received status, it’ll be live on your listing and available for purchase. Your order fulfillment will now be taken care of by Amazon’s FBA team.
Things to Note
- You can modify the number of boxes in this step, but you must reprint the entire set of labels
More Shipping to Amazon FBA Resources
- See a comprehensive guide from Amazon on how to create a shipment
- Read more about sending FBA inventory in Seller Central
- Watch shipping to Amazon FBA instructional videos on YouTube here or here
- Learn more about how FBA works from Amazon’s Seller University
- Look through SKU list field definitions to better understand Amazon vocabulary
- Stay updated on the 2018 U.S. FBA inventory storage fees and policy changes